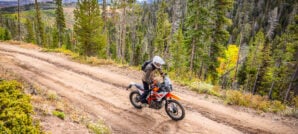
Quick Tips: Simple Ways to Improve Bike Control & Comfort FREE!
Easy adjustments you should make to your ADV Bike before your first ride.

Riders come in all shapes and sizes with all kinds of skill levels and preferences. Yet other than seat height, most models of adventure bikes are a one size fits all sort of situation. To fix that, there are a lot of basic ergo adjustments that can be made to your stock bike with little to no additional expense. For those of you rolling your eyes because this seems basic to you, there are many more riders who have never moved their levers or bars from the “stock” position, just because they don’t really think about it.
First off, there is no stock position for bars and levers. When a bike shows up to a dealer, it is in a crate with the controls off the bike. Someone at the dealer has to put the bars and levers on and not to say that they do a bad job, it’s just that they have no idea who is buying the bike and therefore have a very slim chance of getting the ergos and controls set up right where you want them. Off-road racer, rider coach and founder of AltRider, Jeremy LeBreton, has been giving presentations about this for years. Here are some of the highlights.
Stand Up, Levers Down
Jeremy likes to do this thing where he asks his audience to extend their arms straight out in front of them, open their hands and point their fingers straight up with their palms facing forward. Then he says to hold that for five minutes. People don’t, but his point is that when you are standing on the bike with a finger on both clutch and brake lever (like you always should) if the levers are parallel to the bar this can put stress on your wrists. There is no reason to force your hand into this position if it is uncomfortable. By dropping the levers to where your wrists are in a more comfortable position when standing you are adding comfort and safety.


“A lot of guys just don’t take the time to do this because they just never really think about it. Everyone thinks the guy from Craigslist or the teenager in the back of the dealership is going to do it right. Something so simple and free and easy can really make a big difference,” says Jeremy.
Also, don’t be afraid to use the adjustment wheel on the levers. They are there so you can dial in your levers to match your correct hand size. Reaction time is critical when riding off-road and when you need to pull either lever, you finger should be on it ready to go, not fully wrapped around the grips.
Teflon Tape Your Perches


This tip comes from the world of off-road. If you ever watch professional racers take a spill and then just use their hand to bang their bikes levers back into place, it is because they are using teflon. For dirt bikes, some aftermarket perches come with a layer of teflon between the perch and where it will clamp on the bar. You can get the same benefit by just using some plumbers tape. Go around your bar two or three times where your perch will clamp, the mount it up. When tightened down all the way, you should not be able to spin it with your hand, but a sharp impact with the ground will spin the whole clutch perch rather than breaking the lever or perch. Then, just bang it back into place.
Keep Track Of Your Controls


“After you’ve put the time and the work over the last three weeks to adjust your bars and levers all in the exact perfect position for you, mark them so you know where they should be if they move after a tip over or when replacing parts.”
You can you use a permanent marker, or a scribe if you want to get really permanent. Mark the bar clamps/bar and your lever perches/bar so if any of the controls gets out of position, you have a definitive reference point.
Don’t Neglect The Pedals
Just like adjusting your handlebar levers to suit the standing position, the brake and shift pedals can be adjusted as well. When you are sitting, your foot position is naturally tilted more forward and street-bike style controls reflect that by being positioned lower than the peg. On ADV Bikes, the “stock” position is most likely close to this orientation. But when you stand, your foot levels out perpendicular to the ground and reaching the pedals becomes much harder.

Each bike is different when it comes to adjustability. Some don’t allow you to change the brake pedal placement, but there are aftermarket pedals that have a higher and lower braking platform that work for both sitting and standing. We would suggest finding a setting somewhere in the middle that is comfortable for both sitting and standing to start with. Then if you know that you ride mostly off-road, set the pedals more level with the pegs because it is easier to adjust to that setup on the street than to adjust to a street setup on the trail. That being said, if you are a mostly street rider, the pedals should be adjusted lower to be more comfortable in the seated position.
Foot Peg Refresh
If you’re bike is a couple years old and retains its stock pegs, the teeth might be rounded off pretty good. Instead of buying new pegs, you can grab a file and freshen up the edges on the teeth. But as Jeremy says, “be mindful of the shape of the teeth.” Not only are sharp points going to drastically reduce the life of your boot, they can be dangerous.
“It is amazing what putting the edge back on your pegs can do. You’re not making sharp points, you’re making 90 degree, sharp edges again.”
See Also: Quick Tips: How To Set Your Rear Sag On An Adventure Bike
Author: Sean Klinger
With his sights set on doing what he loved for a living, Sean left college with a BA in Journalism and dirt bike in his truck. After five years at a dirt-only motorcycle magazine shooting, testing, writing, editing, and a little off-road racing, he has switched gears to bigger bikes and longer adventures. He’ll probably get lost a few times but he’ll always have fun doing it. Two wheels and adventure is all he needs.
Related Stories
Related Stories
 Quick Tips: Are You Destroying Your Technical Riding Gear? After dropping a huge chunk of dough on a brand new adventure bike,...
 Quick Tips: How To Set Your Rear Sag On An Adventure Bike What is sag? There are a lot of different kinds of sag but...
 Quick Tips: Adventure Boot Cleaning and Care Your boots take a lot of abuse. From water to mud to rocks...
Popular Stories
KTM 690 Rally Spotted in Near-Production Form
KTM’s “Adventure” models have become one of t...
2,500-Miles In 5 Days On A KTM 390 Adventure R. Here’s How It Went
You don’t ride long distances on the highway with...
Ducati Announces Specs & Pricing Of Street-Legal 450 Enduro Model
Ducati has officially unveiled the Desmo450 EDS...

Sena Launches Their First Dual Sport Helmet
Sena is expanding its smart‑helmet lineup again...
Notify me of new posts via email
Thanks, Sean. Good Tips, I got some schoolin’ today. Thanks.
I have one for you, Sean. I studied the change of the hand position on the throttle grip, displayed in the photos above. I note the change in brake lever position (lever moved downward), good. But, I also note the “overgrip” being applied to the throttle control in the 2nd picture.
While a comfortable grip position, this is a classic setup for “whiskey throttle” for a beginner. If a beginner “squats”, or sits back for a change of trail conditions, then they will rotate that throttle onward, further open.
They need to be warned, because getting thrown off the back of the cycle because a rider panics, and freezes on the throttle while rotating it open, is *no* fun. Don’t ask me how I know
Bob you couldn’t be more right about the “Whisky Throttle” ! Up north we call it the Jack Rabbit or Mule Kick grip! A warning label should be attached or added to each manual safety section. But! What young beginner takes time to read a manual these days.
Sean – Foot Pegs! In addition to tuning edges should one consider the the length of peg in relationship to width of boot between arch and toe sole section ?
Also, in your experience of pre-ride by wire would you have any tweaks to improve throttle control from grip to carb other than removing cable slack? Eg; cable housings good better best. As well as routing a cable to get better response.
Dave
Hey Dave. A set of wider pegs will give more grip but you also have to consider how wide to go if you want to avoid catching rocks off-road. Sometimes too much grip is a bad thing if your can’t easily slide a foot off for a quick dab. This really comes down to personal preference. It’s always good to check your throttle and clutch cables for slack and ensure they aren’t being stretched or pulled due to adding bar risers or taller bars. You can also lube your cables periodically to ensure the smoothest action and response.