Making Moto Videos: Advanced GoPro Shooting Tips
Make more interesting videos by shooting with a variety of camera angles.

Most of the moto videos we see online tend to be a never ending stream of helmet camera footage. Helmet camera footage is easy to film, but it’s harder to turn into content other people want to watch. The more interesting moto videos usually include a variety of different camera angles, as well as some narration about what’s going on in the shot. It’s a bit more work to capture video from multiple angles, but the end result is something that is more likely to capture people’s attention.
In the first “Making Moto Videos” story, we discussed the basic principles of shooting good video. In this installment we’ll go over some of the more advanced shooting techniques that will make your moto videos more interesting.
Mounting the GoPro on Your Bike
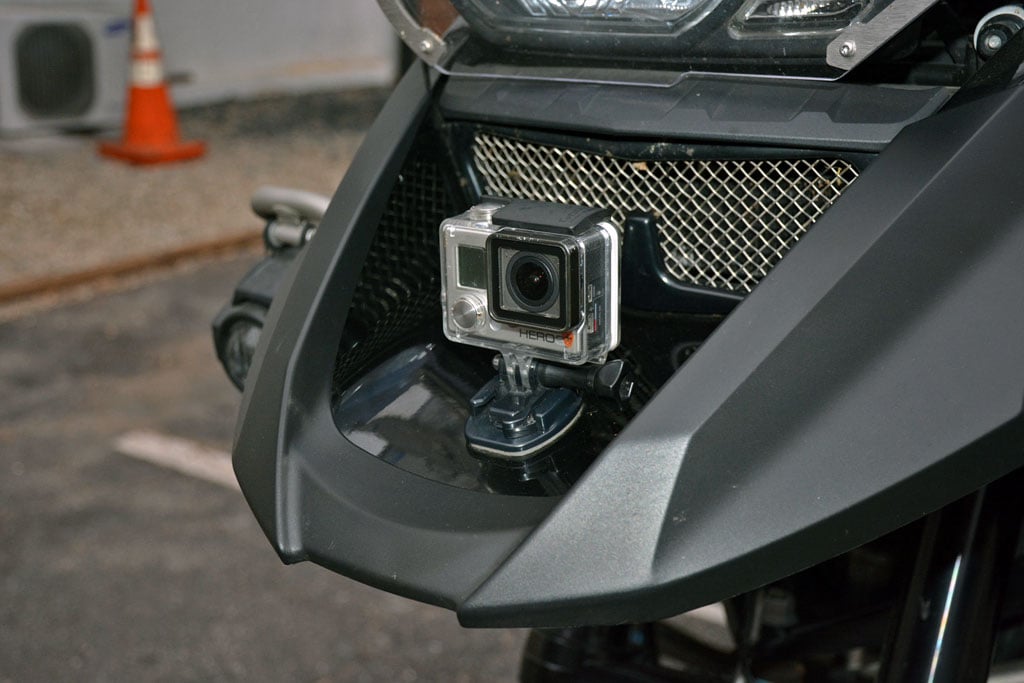
There are many different places you can mount your GoPro on your bike so that it captures the action just like you remember it. Wherever you place the camera, it’s important to try to mount it as close as you can toward the mass of the motorcycle. For example, as mentioned in part one of the series, mounting a GoPro on your mirrors doesn’t work because it’s too far away from any significant mass and subject to vibration.

The crash bars on the BMW R1200GS offer a solid mounting point for your GoPro.
Flex Clamp Mount:
The GoPro Jaws Flex Clamp mount is an adjustable spring loaded hand clip that lets you quickly mount a camera onto a variety of locations on your motorcycle. It’s rubberized, so it holds on tight and dampens unwanted vibration. The Flex Clamp is popular for mounting your camera on handlebars or crash bars. It also comes with a long adjustable neck extension that allows you to precisely position the camera for the optimal angle.
Flat Adhesive Mounts:
GoPro flat adhesive mounts are handy for mounting your camera on any flat surface. The adhesive mounts stick on securely and are waterproof as well. They are also easy to remove with a mild solvent and I’ve never had one leave a mark on my bike or helmet after removal.
For rigorous off-road riding, you may want to take the extra precaution of securing the adhesive mount with a small screw. Here are two locations I use to mount my GoPro with the flat adhesive mounts.

A Topbox mount allows you to get a perfect frontal view of the riders behind you.
Place the adhesive mount as far back on the fender as practical to reduce vibration.
.
Shooting Off the Bike
Another great way to shoot good video with your GoPro is to use it off the bike. You can create selfie videos by holding a GoPro mounted on a monopod or capture your riding buddies attempting challenging terrain.
Here’s an example video demonstrating how we used a Telescopic Monopod to capture the action from a group ride as we splashed through a water crossing in the Sequoia National Forest of California.
Choosing Optimal Camera Settings:
Just as important as getting the right angle is choosing the right settings for the shot. The latest GoPro models allow you to set the field of view, resolution and frame rate. Field of view controls how much of the surrounding scenery is captured in the shot, resolution controls picture quality and frame rate controls the smoothness of the action.
In a perfect world, we would always choose the highest possible resolution and frame rate so that every millisecond of action gets captured in full detail. In the real world, storage is a limitation and the higher your resolution and frame rate, the more space each minute of filming will take up on your memory card.
You can use the optimized settings below to produce HD quality moto videos that will look great on your HD Television or YouTube channel. Keep in mind that settings may vary between different GoPro models, but the basic logic outlined still applies.
Helmet Cam/Bike Mount Settings:
A wide field of view will help ensure you capture all the action and scenery of your ride. For long duration filming, you can quickly fill up your memory card if your settings are too high. Use a moderate resolution (720p) and frame rate (30fps) to reduce storage consumption. For short, high-action sections of your ride, you can up the frame rate to 60fps or even 120fps. A faster frame rate will allow you to create smooth slow motion replays, should something unexpected happen like this:
Close-Up Low Action Settings:
If you are filming a narration scene or other close-up shot where there is little action going on, choose a narrow field of view. A narrow field of view allows you to capture more detail and avoid “fish-eye” distortion at the edges of the picture. Use a lower frame rate (30 fps) to reduce storage usage when there is little movement going on.
High Action Handheld Settings:
If you are using the GoPro as a handheld camera or attached to a monopod for high action footage, you’ll want a wide field of view to make it easier to capture all the action. You can choose a higher resolution (1080p) and film at a higher frame rate (60fps) or if you really want to slow the action down later, try capturing at 720p and 120fps. This will allow you to create awesome looking slow motion replay clips later during the editing phase.
Resolving Resolution:
It’s a good idea to use the same resolution for all your shots on a ride if you plan on doing any editing later. Basic video editing software is usually pretty good at converting most settings, but joining clips of different resolutions together can sometimes be problematic. Staying consistent with your resolution settings will help you avoid problems later.
Conserve Your Memory Card Storage
Be selective about when and how long you record to help extend your storage. Stop recording during long highway stretches to save space for when things look more interesting. Also, long record times create larger file sizes that are harder to work with during editing. You’ll be much happier during the editing phase if you capture a variety of shorter high-impact clips on your trip.
Experiment Before Your Next Trip
Every motorcycle is different, so you’ll need to experiment with different mounting points and camera settings to find the best setup. Spend some time experimenting until you discover the optimal mounting points that offer the least amount of vibration.
Take a day to experiment before you depart on your next big adventure. This will allow you to dedicate your attention to figuring out your setup without the pressures of a trip. You can do it on a free Saturday or just try leaving early for your daily commute. That’s exactly what I did here in this video clip.
Not all the shots in the video were perfect, but that’s OK because this was just an experiment. The takeaway here is that shooting with multiple camera angles makes your video more interesting for others to watch. The Jaws Flex Clamp mount in conjunction with the helmet mount, allowed me to easily create several different camera angles and I was able to transform a mundane ride to work into something that feels like a well-produced video.
Try experimenting with these GoPro camera angles:
- Handlebar selfie
- Forward handlebar mount
- Forward crashbar mount
- Forward helmet cam
- Rear helmet cam
- Rear rack or top box
- Monopod selfie
- Handheld camera action
.
More Moto Video Pro Tips To Come
If you follow the guidelines outlined in this article, you should be able to start producing more interesting moto videos from your rides. In the next edition of the “Making Moto Videos” series, we’ll discuss equipment management and basic editing.
Other Stories In This Series
Related Stories
Related Stories
 Making Moto Videos: Pro Tips For Shooting Better Video If you are like a lot of Adventure Riders, you enjoy capturing video...
 New Brace Helps Prevent Valve Cover Damage on R1200GS/A During a recent Cycle World bike test, the stock crash bar on the...
 Mystery Bike Revealed – KTM 1290 Super Adventure Earlier in June of this year, spy photos were captured of a new...
Popular Stories
Sena Launches Their First Dual Sport Helmet
Sena is expanding its smart‑helmet lineup again...
Ducati Announces Specs & Pricing Of Street-Legal 450 Enduro Model
Ducati has officially unveiled the Desmo450 EDS...
Honda Debuts Adventure Motorcycle Film On Streaming Platforms
Honda is bringing its flagship adventure‑tourin...
Classic Meets Modern Rally In This Dialed Honda XR600R Build
For many riders, the XR600R needs no introducti...
Notify me of new posts via email
[…] • Making Moto Videos: Advanced GoPro Shooting Tips […]
GoPro + MonoPole Sticks and Motorcycles just go together. Here is one I took on the Blue Ridge Parkway a few weeks ago. http://youtu.be/PuUNjm6zFmc
Jim, I really enjoy your very informative discussions on video making. I’m a long time motor biker and enjoy photography and putting little “videos” together of my trips. But, I’m just now getting interested in on-board videoing. Since I’m just getting started with this, what do you think about the entry level GoPro Hero to get started and then go from there. Thanks, David Hall
Awesome tips! I recently got my first GoPro, and I started catching some great tips. So far I’ve found this great guide: http://www.videostudiopro.com/en/pages/gopro/ on editing the videos, but I also wanted to get some shooting tips, and I found your guide very helpful on that subject. Thank you for these tips! 🙂
I’ve just started taking some video from my bike and all the difficult terrain I went over looks so tame, not steep, slow, etc. Are there ways that better show the difficulty? (I’m new to off road riding too, maybe it was more tame than it felt at the time. ) I’ve noticed the same thing while filming or taking pictures snow boarding or four wheeling.
Thanks for these tips. Now i happen to know the details.