Adventurizing the Yamaha WR250R on a Budget – Part 1
WR250R mods that make it more comfortable and capable for overland travel.

All you have to do is walk into your local motorcycle dealership to see how popular adventure touring motorcycles are becoming. Almost every motorcycle manufacturer is presenting their own interpretation of what an adventure motorcycle should be, and buyers are flocking to the machine that they think will take them to the “back and beyond.”
Top-tier adventure-class motorcycles share similar characteristics when looking at their specifications such as engine displacement, power, comfort, etc. They also share two more characteristics: weight and price. So through the years of the adventure bike evolution, an axiom has developed — a competent adventure travel bike is going to be big, heavy and pricey, especially after being outfitted with all the accessories needed to traverse the harsh landscapes the owner dreams of seeing.
So what are your options if you don’t want the weight or price that is typical for adventure-class motorcycles? Many people have looked at smaller displacement, dual sport motorcycles as a potential solution. And the Internet is full of examples of “dual sport builds” that can be implemented. Often these builds solve the problem of weight but not always price, and many of the available mods for smaller dual sport motorcycles are designed to make them better track performers than long-distance travelers.
If approached properly, however, a small-displacement dual sport can be made into a competent adventure touring bike. This is NOT to say that a smaller dual sport can be made to match the comfort, power and longevity of a top-tier large-displacement adventure motorcycle. But the gap between the two classes can be narrowed while still retaining a reasonable weight and price. And in the next few articles on this subject, we will examine ways in which that can be achieved.

In this segment, we take a look at our bike of choice for this build, its benefits and shortfalls, and the motivation behind the build. First, let’s address one significant challenge when looking to “adventurize” a smaller displacement dual sport. Price! It goes without saying that, with enough money and fabrication expertise, almost anything can be achieved. And when it comes to the “big bikes,” investment in aftermarket products yield a fairly decent ROI for your resale value. But smaller dual sport motorcycles aren’t pricey to begin with, so adding thousands of dollars in accessories to a thumper won’t necessarily add value to the bike.
So you may create a wonderful dual sport/adventure touring hybrid for yourself, but you could struggle to find a buyer that will appreciate what you did, when the day comes you are ready to sell. For this reason, we wanted to keep the cost of the motorcycle and its upgrades relatively reasonable for this build. To meet this goal, we set an upgrade budget of $2,000. In addition, we wanted to keep the motorcycle purchase under $5,000, giving us a “worst case scenario” of a $7,000 total investment.
“Adventurizing” The Yamaha WR250R
We chose a used Yamaha WR250R for this build, which may not be surprising as the WR250R has created quite a reputation for itself, even amongst the “big bike” community. Of the Japanese dual sports, the Yamaha WR250R is one of the most expensive. But for this build, we felt it would be an ideal starting point based on the following characteristics: power-to-weight ratio, off road agility, on road capability and affordable accessories available.

The WR250R is a motorcycle that can go just about anywhere and do just about anything. It is the “pickup truck” of motorcycles. Like many of its counterparts, the WR250R has been left relatively unchanged for years (since it hit the market in 2008). So the year of the motorcycle is not quite as important as the mileage when considering a purchase. A Low-mileage WR250R in good condition and a fair price, isn’t hard to find.
It’s also known for being a well-balanced and reliable machine, with class-leading power from its 250cc powerplant. Yamaha has also given the WR250R a fairly comfortable 6-speed transmission, allowing the motorcycle to cruise at highway speeds with relative ease. Road handling is also good, especially when compared to its Japanese counterparts. But the WR250R, like many of its little friends, has shortcomings for long-distance adventure travel. Let’s take a look at a few WR250R mods that can make an immediate improvement.
Fuel Range
The WR250R comes stock with a 2-gallon fuel tank. Even with its 71 MPG average fuel economoy, this will not take you to the “back and beyond” of things without leaving you stuck there. If doing doughnuts around some abandoned slag heap is all the interest you have, then the 2 gallons of fuel will suffice. But if traveling is what you want, then an upgrade here is necessary.
In order to get the longest range out of the WR250R, we installed an IMS 4.7-gallon fuel tank. In addition to this tank being the largest aftermarket option available for the WR250R, it was also a cost-effective option (MSRP: $359.99). And the design of the tank made installation fairly simple.

Thanks to the the exceptional fuel economy of the WR250R, we were able to increase its range from around 142 miles to approximately 334 miles. This important upgrade increases the distance the WR250R can travel between fuel stops, and gives it a better fuel range than most of the big-bore Adventure Bikes on the market.
Seating
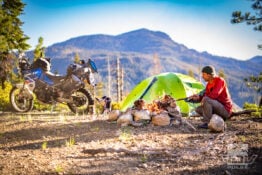
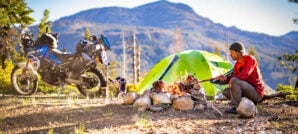
This may be subjective to say, but sitting on the stock seat of the WR250R for more than half an hour is like trying to scale an elm tree naked. It hurts terribly, and you have to question what kind of permanent damage you might be doing to your “special place.” So it makes sense to have a seat change as the next item to address with the “adventurization” of the WR250R. Aftermarket seats are often pricey. However, we found a comfortable and affordable seat solution from Seat Concepts (MSRP: $279.99).

We should also point out the high seat height that comes with the stock WR250R. At 36.6 inches, the WR’s seat is about 1.6 inches higher than the BMW R1200GS Adventure. For those with a shorter inseam, Seat Concepts does offer a “low” seat for the WR250R that makes it easier to touch the ground.
Wind Protection
The amount of wind protection needed when traveling seems to be a very individual preference. Some like smaller fly screens, while others want a giant front sail to push through the wind. The WR250R, like the other smaller dual sport bikes, has neither of these options. Some type of wind protection will be necessary if you plan to spend much time on the highway. Since the WR250R is incredibly lightweight when compared to the “big bikes,” there was some concern about using too large of a shield. Pushing a large shield through the wind could cause some instability, requiring a steering damper to stabilize the front end (a pricey solution). We also didn’t want a large windscreen that would be cumbersome off-road.

Fortunately, we were able to find an affordable, functional windshield from Cee Bailey (MSRP: $109.95 tinted). A simple shield that, with a bit of drilling, connects directly to the stock front number plate on the WR250R. This takes the wind pressure off the chest and pushes the area just above the head (assuming an approximate rider height range of 5’10” to 6’1”). The Cee Bailey windshield was also a bit wider than some of the other options we considered, giving extra wind protection for the torso without being too tall for off-road use. The long-standing, good reputation of Cee Bailey was the final aspect that attracted us to this solution.
More WR250R Mods to Come
Addressing the fuel range, seating and wind protection of the Yamaha WR250R is a great start to making a competent dual sport/adventure traveler hybrid. But there is more to do and more money to spend. So far we’ve gone through $750 of our $2,000 budget for WR250R mods. In Part Two of our “Adventurizing the Yamaha WR250R on a Budget” series, we will be addressing ergonomic solutions, cargo options, protection, and more. And we will be addressing these issues, hopefully without needing a second mortgage on the house. So stay tuned for more to come!
Related Stories
Related Stories
 Adventurizing the Yamaha WR250R on a Budget – Part 3 Over the past few months we have been looking at both useful and...
 Adventurizing the Yamaha WR250R on a Budget – Part 2 For those just tuning into this article series, we have been looking at...
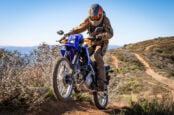 2026 WR125R: Yamaha’s Accessible, Capable Entry-Level Dual Sport Small‑bore dual sports have always played an outsized role in bringing new riders...
Popular Stories
Sena Launches Their First Dual Sport Helmet
Sena is expanding its smart‑helmet lineup again...
Ducati Announces Specs & Pricing Of Street-Legal 450 Enduro Model
Ducati has officially unveiled the Desmo450 EDS...
Honda Debuts Adventure Motorcycle Film On Streaming Platforms
Honda is bringing its flagship adventure‑tourin...
8 Simple Things To Make Moto Camping More Comfortable
For adventure riders, camping can be a divisive t...
Notify me of new posts via email
This is my ‘adventure’ bike of choice (X model). Looking forward to the next installment.
Thanks for following, Doug! Hopefully we won’t disappoint. 🙂
Been wanting to do something like this for a while. Can’t wait for Part 2!
Hopefully this will give you some insight or helpful ideas. Thanks for tuning in.
I think it is fantastic that you are open to addressing the small ADV bike movement
The small ADV SEGMENT has been championed by riders such as EVERIDE , BIG DOG and Tim tewster2 in America, also Chronicals of solid in Australia
I am hopefull that the bike manufactures see your small bike ADV BUILD story and move more in this direction by at least offering 250 to 400 cc dual sport / ADV Ready bikes at or around 300 lbs. while there are current offerings from Honda CRF L and Suzuki like the DRZ 400 while adequate they fall short mainly it the areas of HP, suspension or utilizing 5 speed transmissions
I am hopefull the upcoming CRF 250 rally will address some of the current short commings of the current model. It is agreed by most that the WRR IS the most competent of the 250s and is a popular build plaform, The common issue with the WR always comes to the Price$. Is the 7000 plus Out the door price before any ADV Mods Which can easily reach 10,000$ for this 250 a value. Especially when compared to its closest competitor and at around 2000$ less the CRF250 L
We can be hopeful that articles such as this and riders such as those mentioned above who ride from the east coast to Alaska and back on WR 250’s or like Steph Jeavons who is currently riding around the world on a CRF 250 L are representative of what more people want. Not everyone wants a 12000 $ and up 500 plus pound bike that requires expensive maintenance
A lower cost light weight ADV bike would go far in that more people would consider getting involved in motorcycling and exploring our Back country Dicovery routes
THANKS for documenting this ADV build
It may be interesting to do a comparable build on the CRF 250 L and compare it to the WRR
Is the extra 2000$ for the WRR really worth it ?
You are right. The WR is the pricey when compared to other Japanese, small displacement dual sports. We chose it because is of how competent it is. It has a reputation for being effective both on and off road, again when compared to its Japanese counterparts. If one were to buy a new one, then the price tag with accessories could get prohibitive, or at least impractical. We set a goal of not crossing $7,000.00 including the purchase of the bike and the accessories. This number is still higher than what another buyer may pay for the outfitted WR. But that is the case with just about any aftermarket upgrades to any motorcycle. The $7,000.00 number assumes a used bike purchase and focuses on upgrades that will at least narrow the gap between the smaller dual sports and the “big bikes”.
Thanks so much for your insightful comment. And thanks for tuning in.
Thanks for the geat article and budget build ideas – look forward to the next article in the series – I’m still waiting and looking forward to the ADV Pulse follow up article to the DL650XT (with protection added and off-road capability that was mentioned in the review of that bike) Both bikes represent economical approaches to getting out and seeing the world with more $ left over for the travel part of the equation – we budgeted a similar amount for our DL650 build (stock model) and will have similar $ invested as this 250 build – might be an interesting comparison of what X dollars will get you – sporty high bred dual sport for tougher terrain solo or 2 up capable, tough, comfortable, proven, slower paced pack mule world traveller that you can ride solo – sort of the 65/35 vs 35/65 road/offroad for X dollars article? Really enjoy this site and all the great info – hope to see Both the WR250 and DL650XT follow up Articles in the future!
Hey Michael. Thanks for the kind words and input. We haven’t forgotten about the V-Strom follow up article. It is coming up soon!
Looking forward to it – thanks for the update!
Thanks so much for this insightful comment. I also believe it would great to compare the two setups in the future.
Looking forward! Have one and will now start to adventurize mine. Hope your second part to be out soon so i can get some ideas!
I believe that the phrase is “the back of beyond”.
Sorry, should also say thank you for the article – I’ve been looking seriously at a WR250R for remote travel here in Australia due to the WR’s light weight – much easier to pick up when you fall off.
Really liking this article Jim! excellent job for Part 1. Can’t wait for the second instalment amigo.
Cheers,
Alberto.
My girlfriend and I are about to embark on a RTW trip, on WRs.
I just returned from a 3 week, 4,000 mile adventure on my WR and my friends on larger bikes were so jealous of how easily I glided through the sections they found difficult. I have some of the mods mentioned here (fuel tank and seat concepts low seat) but I think I’ll have to add the windshield. I don’t usually mind the lack of a windscreen but I ended up having to return from my trip early via the interstate in a strong headwind and was really getting beat up.
Just bought a bone stock 2012 WR250R with low miles. The timing of your series couldn’t be better! I am taking notes and looking forward to the rest of your recommendations.
The WR is on my dream list, and your top 3 mods are also the top 3 on my list! I would like to see if you also look into making further adjustments to reduce the seat height.
So … when is part 2 going to be published? Is there a part 2?
also awaiting guys, dont disappoint us!
Here is the direct link to it. 🙂
https://www.advpulse.com/adv-bikes/yamaha-wr250r-upgrades-2/
Of course there is! :-). And it’s on the site for you. Here is the link.
https://www.advpulse.com/adv-bikes/yamaha-wr250r-upgrades-2/
Greetings from Australia. I have just started to look into mods for my WR250R for adventurizing. Looking to start with fuel range and luggage racks. Looking forward to part 2. Thanks
Cameron,
Part 2 of this series is up on the site. Here is the direct link to it. Ride on!!
https://www.advpulse.com/adv-bikes/yamaha-wr250r-upgrades-2/
I just found your article – so far, so good. I bought a used WR this year and am in the process getting it ready for a BCDR trip next summer. Timing is everything! Looking forward to your next installment. Light weight adventure bikes are where it’s at but the prevailing adventure bike assumption is that it needs to be a 600 pound, 1,000cc behemoth. Wrong. Light and spartan is safer and more fun, IMO.
Thanks David. We are putting some final touches on the next installment. So you can expect it very soon. Ride on and ride safe out there!!
This is awesome ADV Pulse! I bought a new ’16 WR250R in the spring with the intentions of working up to road trips and motorcycle camping. This article is really inspiring! I just bought the same windscreen you recommend, some handguards and luggage. I love the notion that you can travel limitless miles on this bike with a few upgrades and put those $20k 500 pound adventure bikes to shame! Can’t wait to see what you guys do next for inspiration! Keep it up! Braaap!
Thanks Levon!! You can expect the next installment this coming week. Lots of nifty stuff coming. We hope it will be helpful.
[…] Part One of this series, we addressed, seating, fuel range, and wind protection. Now we will be looking at […]
EXCELLENT article. Can you list the other windshields you considered? I’d love to have some to compare and then make a choice. My 2015 WR250R is almost adventure ready for some long-range fun but no windshield yet.
There were a couple of other options we looked at. We chose the Cee Bailey screen because of the company’s good reputation and the price. We also chose it for it availability in the US. Options were limited, but we looked at the Screen For Bikes windscreen (Austrailia) and a new dual sport rally shield from Parabellum (USA). The Parabellum screen is quite a bit taller, more verticle in its position, and would probably provide the rider with significantly more wind protection. It was also a bit less expensive. This is a shield that I will personally be testing out soon.
Thanks for the reply Jim – I took a look at the Parabellum site and REALLY liked the look better than the other one – and I like how they decided to mount it as well. I ordered it and the headlight cover just now. I’ll let you know my thoughts when I get it mounted. Hopefully before heading to Clear Creek for an adventure next weekend!
Finally got a chance to install the Parabellum shield. Instructions were clear, drilling-template was easy to use, shield (and the headlight guard too) were both manufactured well – great look, clear, thick, consistent edges. Installed without a problem and took it for a few rides now. ZERO issues – and I really like the rally look it gives. Super happy. Great value and great product.
[…] of WR250R accessories and upgrades to enhance performance, handling, and comfort (check out Part 1 and Part 2 for build details). There were many selections we made that we felt would improve the […]
Its just missing something!? Oh wait i know… 😉
Overall, I’ve found it to be very reliable and easy to ride in all conditions.
Overall, I’ve found this bike to be very reliable and easy to ride in all conditions.